Creating multiple contracts with the Contract Creation Utility
SICHERHEIT The Contract Creation Utility requires a dedicated API User account.
NAVIGATION Contract Creation Utility
BEVOR SIE BEGINNEN This article assumes that you are familiar with contracts in Autotask. For an introduction, refer to Einführung in Verträge.
About the Contract Creation Utility
Autotask provides a web-based utility that allows you to create contracts of the same type for multiple customers in one pass, using the Autotask API.
Instead of populating contract information into a single contract, you are able to select multiple customers and create identical or similar contracts for all customers simultaneously. This tool will significantly speed up the creation of contracts during your Autotask implementation or at the beginning of a new business year, and vastly improve the consistency of contracts between customer accounts.
Most features of the single contract wizards for the various contract types are available, including support for Multi-currency.
The Contract Wizard and the Contract Creation Utility have the following major differences:
- The Contract Creation Utility requires a dedicated API User.
- For recurring service contracts, you cannot specify the number of occurrences, you must specify an end date instead
- You cannot populate contract user-defined fields
- The utility will not generate notifications that contracts have been set up
- You cannot set up initial payments for fixed price contracts (they would have to be set up as already posted)
- Charging tax on eligible labor and charge items (For Retainer Tax module users only) is not supported
HINWEIS All contracts created with the Contract Creation Utility can be deleted in Autotask. If you added purchases to block hour, retainer or per ticket contracts, these must be deleted first.
What contracts should you create first?
If you exclude certain roles and work types from some contracts and use default exclusion contracts to bill for them, it is a best practice to create the default exclusion contracts first. This allows you to specify them in the utility when you create additional contracts.
How To...
Follow the steps in Einen API-Benutzer hinzufügen oder bearbeiten to create an API User for use with the Contract Creation Utility.
- Enter a First Name and Last Name. You can use something generic such as Contract Creator.
- Enter a valid email address. Select a security level and Primary Internal Location.
- In the Credentials section, enter values for Username (Key) and Password (Secret). The username should follow the format you use for logging in to your Autotask instance. You can use a generic value like "ContractCreator@yourAutotaskdomain.com". You will use this username and password to log into the utility.
- In the API Tracking Identifier section, select Integration Vendor.
- In the Integration Vendor field, select Autotask - Bulk Contract Creation Utility.
- Complete any remaining fields as desired. Click Save & Close when you are finished.
To access the Contract Creation Utility, do the following:
- Navigate to https://contracts.autotask.net.
- Enter the Username and Password for the dedicated API User resource and click Login.
- All active records from your Autotask instance where the Account Type is equal to Customer are loaded into the utility. Depending on the number of customers, this may take a few minutes. When all customer accounts are loaded, the Search & Select Companies page is displayed.
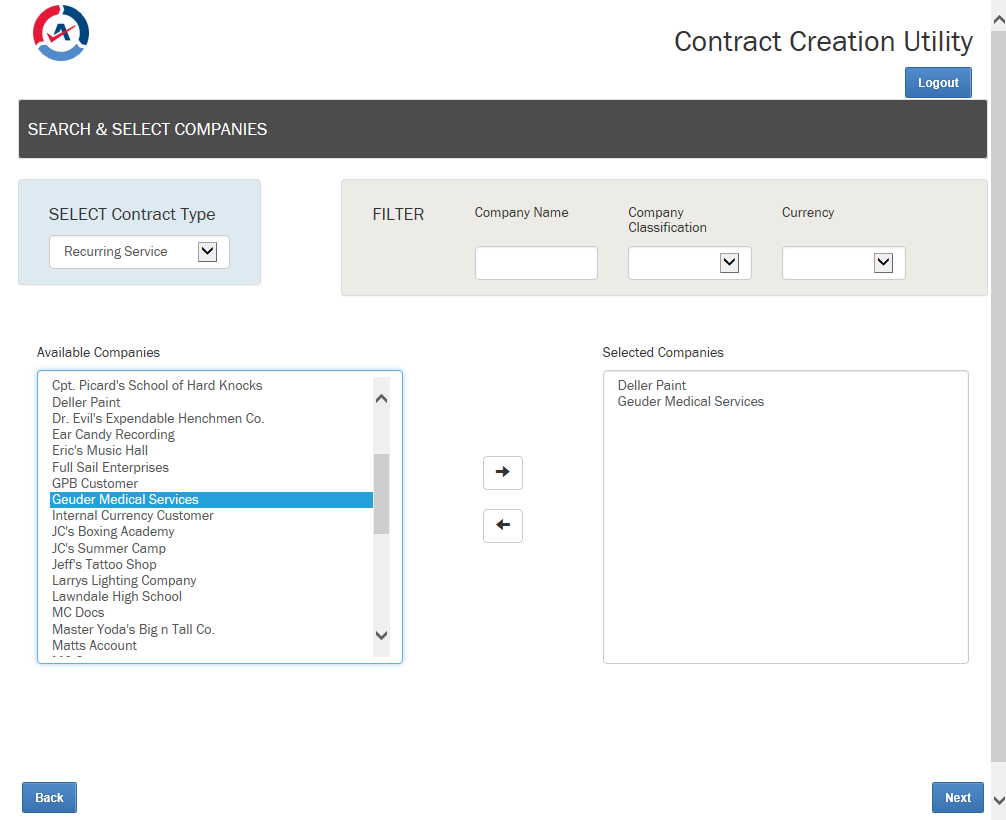
On this page, you select the contract type and the companies you want to create a contract for.
Populate the following fields:
| Field | Description |
|---|---|
| SELECT Contract Type | The contract type defaults to Recurring Service. Click the drop-down icon and select a different contract type if desired. |
| Company Name | To filter your customer organizations, start typing in the Companies Name field. A smart filter will display the matches in the Available Companies pane. All matches that begin with the string you typed are displayed. |
| Company Classification | You can also narrow the results by selecting a Company Classification. Once an organization has been added to the Selected Companies pane, you can clear both filters and perform a new search. |
| Currency | This filter is only available if your Autotask instance has Multi-currency enabled. Click the Currency drop-down list and select a customer currency. TIPP Best Practice: Although you can create contracts for organizations with different currencies, we do not recommend it, because the "copy down" feature (that is, the whole point of using the utility) will be disabled. We recommend that you do filter by currency. |
| Available Companies | Initially, the Available Companies page lists all active customer accounts. As you apply filters, the list of organizations is reduced to organizations that are a match for all current filters. Double-click an organization name or highlight one or more organizations and click the right arrow to add them to the Selected Companies pane. |
| Selected Companies | The Selected Companies pane shows the customers a contract will be created for. Double-click an organization name or highlight one or more organizations and click the left arrow to remove them from the Selected Companies pane. |
When you have selected all organizations you want to create a contract for, click Next.
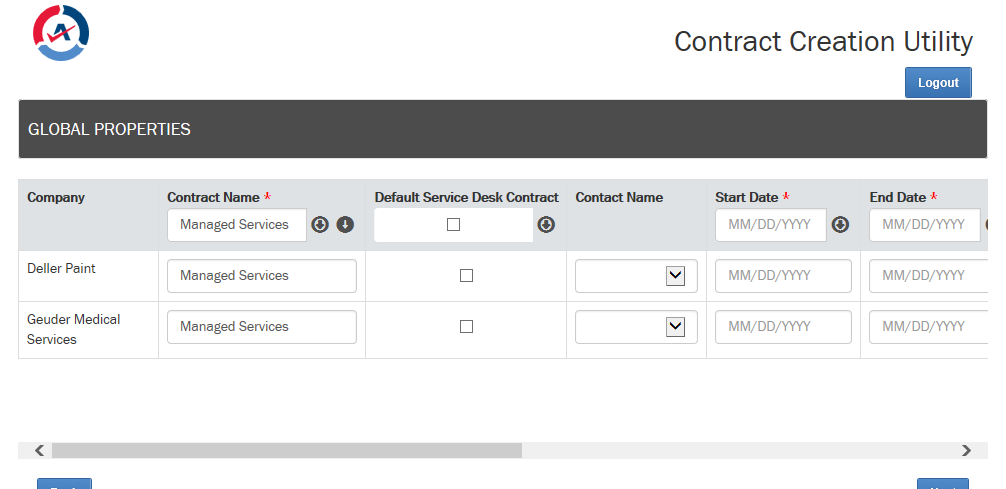
All contract types have the Global Properties page in common. On this page, you will first see the icon (a down arrow![]() ) that allows you to copy selected settings to all contracts you are creating.
) that allows you to copy selected settings to all contracts you are creating.
- In the header row, enter data or make a selection.
- Click the down arrow
 to apply your settings to all contracts.
HINWEIS Note that all settings you copy down remain editable, and you have the ability to individualize the contracts.
- Complete the following fields:
| Field Name | Description |
|---|---|
| Contract Name (required) | Enter a name for the contract. A descriptive name will be more useful when it appears in lists, for example, when applying a contract to a ticket. To append the organization name to the beginning of the contract name (highly recommended if all contracts have the same name), click the second down arrow |
| Default Service Desk Contract (check box) | When selected, this contract will be the default contract for all tickets created within the contract date range. You can change the contract used when creating or editing a ticket. If your administrator has enabled the Service Desk-Standardvertrag für alle Kundenportal-Tickets verwenden system setting, this contract is also automatically applied to any incoming Client Portal tickets. If the organization is a parent organization, this contract becomes the default contract for all sub-organizations without their own default contracts. HINWEIS If you select the check box and a default service desk contract already exists for an organization, a dialog box will allow you to open the existing contract, and either accept the new default contract or close the window and clear the box. |
| Contact Name | Optionally, select an individual as the contact for this contract. The drop-down list contains all active contacts associated with the organization selected in the Company Name field. Refer to Kontakte hinzufügen und bearbeiten. |
| Start Date (required) | Select a start date for the contract. If you are manually entering the start date, you must use the MM/DD/YYYY date format, regardless of the format you use in your Autotask instance. The start date (day) of the contract is the start date (day) of each billing period. WICHTIG The start date of the contract automatically becomes the billing date for all services and bundles in the contract. If the start date is the 21st of the month, billing for all services and bundles will recur on the 21st. If you want your billing date to fall on the beginning or end of the month, but pro-rate services for the remainder of the current month, refer to Abrechnung für einen laufenden ersten Monat. HINWEIS If the start date is on a date not in the current period (for example, the start date is on the 31st and the next month only has 30 days), the last day of the month will be used for the billing event. If the hard end date of the contract is not the planned last day of a period, the charge for the last period will be prorated. |
| End Date (required) | Select an end date for the contract. If you are manually entering the end date, you must use the MM/DD/YYYY date format, regardless of the format you use in your Autotask instance. The contract is active from the start date to the end date. If the hard end date of the contract is not the planned last day of a billing period, the charge for the last billing period will be prorated. |
| Contract Description | Optionally, enter a brief description of the contract. The information appears in the Contract Selector to help users in selecting the right contract for a ticket or project. Click the Down arrow to apply the description to each contract. |
| Service Level Agreement | Optionally, select an SLA to apply to this contract. If Service Level Management is not enabled, the drop-down list will be blank. Refer toService Level Agreements verwalten for more information. |
| Contract Category | Although not required, the selected category will be available for displaying, filtering and grouping in LiveReports, and filtering on the Items to Invoice page. Contract categories are customizable. Refer to Vertragskategorien. |
|
Line of Business |
Optionally, select a Line of Business for each contract. Refer to Einführung in Geschäftssparten. |
| External Contract Number | A field that lets you link the Autotask contract to an external contract number. |
| Purchase Order Number | If you enter a PO number, it will be the default PO number for any projects, tickets, or contract charges associated with this contract and, where applicable, any services, service bundles, contract setup fees, and milestones created under this contract. The PO number will appear on invoices. For more information, refer to Mit Bestellnummern arbeiten. |
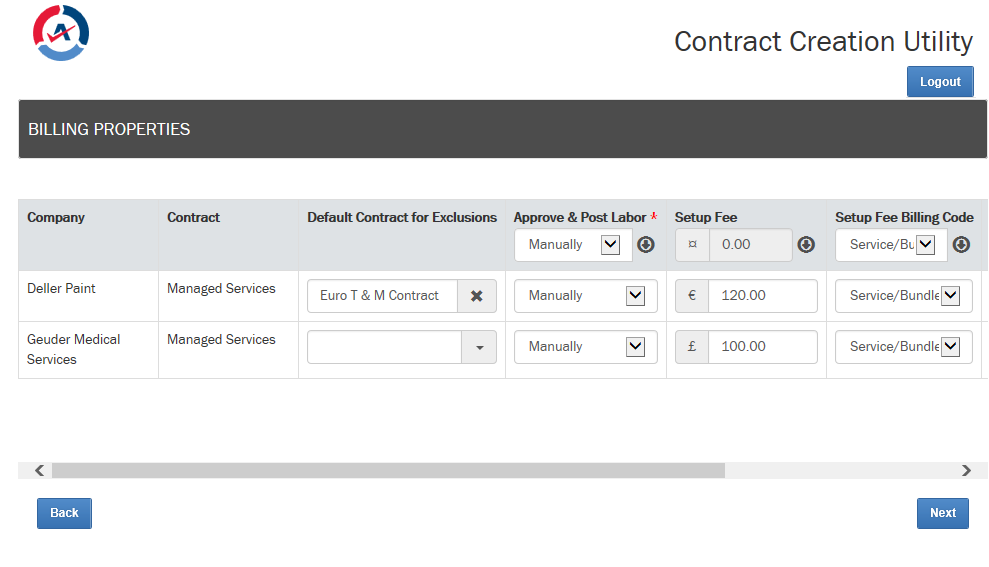
On the next page, you configure the billing properties for the contracts. Some fields are specific to the selected contract type.
HINWEIS If Multi-currency is enabled and you are creating contracts for organizations with different currencies, the copy down feature will be disabled for all currency fields.
TIPP Use the Currency filter on the first page to ensure that only a single currency is represented.
| Field | Description | Recurring | T&M | Block | Retainer | Fixed | Per Ticket |
|---|---|---|---|---|---|---|---|
| Estimated Revenue | Enter the Estimated Revenue you expect to generate from this contract. Although this field is not required, many reports compare estimated revenue, actual revenue and costs. HINWEIS Even if Multi-currency is enabled, this is always entered in internal currency, and is always displayed in internal currency once the contract is created. |
||||||
| Default Contract for Exclusions | If you already set up the contract that will be applied to roles and work types specifically excluded from the current contract, select it from the drop-down list or start typing the name. This is an individual selection for each organization and contract. |
||||||
| Approve & Post Labor (required) | Specify whether you want to approve and post labor manually, on timesheet approval, or immediately without review. HINWEIS Only the Manually option will allow you to go through a separate billing approval stage for labor and allow you to correct mistakes, make adjustments, add missing information, correct spelling, etc. We therefore strongly recommend that customers use the Manually option. Refer to Abrechnungseinstellungen zum Genehmigen von Arbeitsaufwand. |
||||||
| Requires Start & Stop Times | Select the check box to change the time entry method for projects that use this contract from decimal time (flat number of hours) to Start/Stop time entry. Tickets use Start/Stop time entry by default, so this setting has no impact on them. Decimal time, the default for projects, tracks time by hours and fractions of hours, for example 1.5 hours. Start/Stop time prompts resources to enter the time that they began and stopped working on a task, for example, Start 8:30 AM - Stop 10:05. Start and stop time tracking is usually more exact than decimal time entry. |
||||||
| Setup Fee | For recurring services contracts, you can optionally specify a one-time administrative setup fee for this contract. If you specify a setup fee, it will appear as a separate line item (dated the same as the contract's start date) to be approved, posted and invoiced to the customer. Once posted, the setup fee cannot be edited. HINWEIS If Multi-currency is enabled and you are creating contracts for organizations with different currencies, the copy down feature is disabled. |
||||||
| Setup Fee Billing Code | Select a Recurring Contract Service code from the drop-down menu. Make sure this billing code is associated with the correct tax category. Refer to Steuerkategorien. HINWEIS If the contract organization is tax exempt, or the selected code is not associated with a tax category, no tax will be charged. |
||||||
| Contract Period Type | This field determines the billing frequency for services. The drop-down contains the following options: Monthly, Quarterly, Semi-Annual, and Yearly. The default is Monthly. WICHTIG This field cannot be edited. You will not be able to change the Contract Period Type after you save this contract. |
||||||
| Overage Billing rate | For Block Hour Contracts, you can set up an overage billing rate that will be applied to contract labor if no blocks are available. • If you leave the field blank, overage billing is not enabled and labor will be billed at the contract or admin rate for each role. • If you enter a value, that is your overage billing rate. WICHTIG If you copy down the 0.00 rate, you are in effect capping charges for a block period, since you are setting the overage rate at 0.00. |
||||||
| Overage Per Ticket Rate | Enter the overage billing rate. This will become a flat fee contract charge for the overage. HINWEIS Overage is a required field. It will always create a contract charge either at $0.00 or the amount entered. When you use the Copy Contract feature, this field will display the Overage per Ticket Rate from the original contract. Edit as needed. TIPP If you do not add any purchases to the contract, you can use the overage rate to create one-off tickets to bill the customer. |
The next page depends on the contract type you selected on the Search & Select Companies page. You will see the Services page if you are creating recurring service contracts, the Rates page if you are creating time & materials, retainer or fixed price contracts, and the Milestones page if you are creating a fixed price contract.
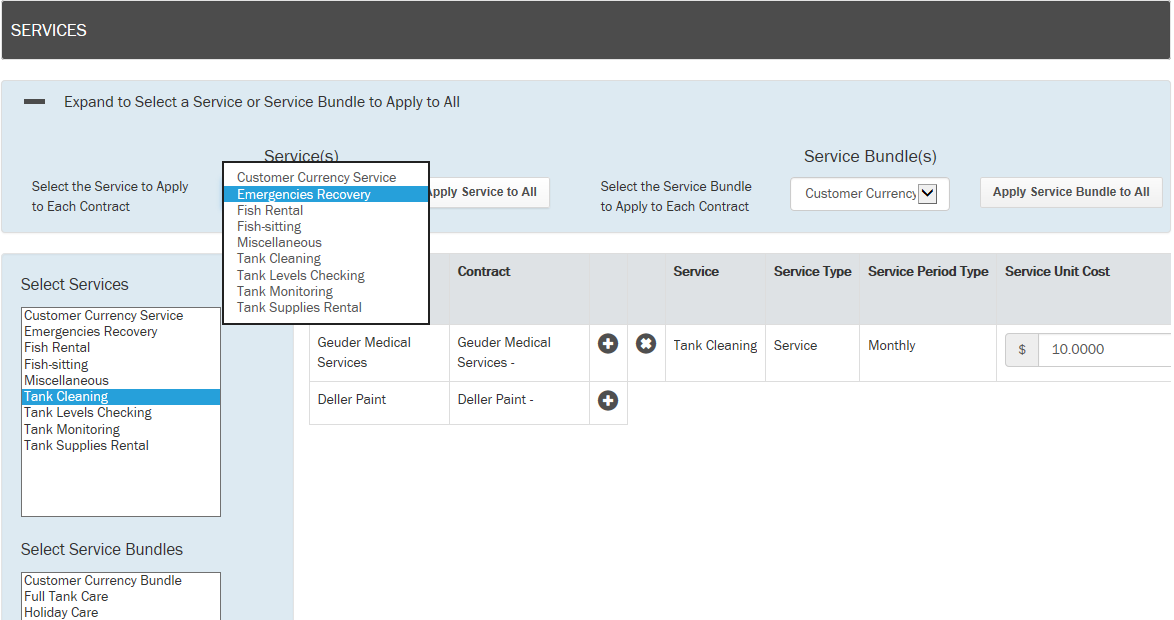
On this page, you add services and service bundles to the contract. You can add services and service bundles to all contracts, or add and remove services from individual contracts.
To add services or service bundles to all contracts:
- At the top of the page, click Expand to Select a Service or Service Bundle to Apply to All.
- Click the drop-down menu in the Service(s) or Service Bundle(s) field and select services and/or service bundles.
- Click Apply Service to All.
HINWEIS All currently selected items are added to all contracts. Make sure to deselect any items you've already added.
HINWEIS There is no way to remove a service or service bundle from all contracts. You must manually remove the services from each contract.
To add and remove services and service bundles from individual contracts:
- In the Select Services pane select one or multiple services using Shift or Ctrl + Click.
- Click the plus sign next to the contract name once.
All selected services are added to the contract.
WICHTIG Services can be added to a contract more than once. This allows you to set a different cost or price for the same service, effective at the start of a new quarter or year. This is different from changing the quantity, where the cost, price and effective date remain the same. So be careful to click only once, unless you mean to add them more than once!
- To remove a service or bundle from a contract, click the delete icon in front of the service name.
- Review the following fields for each service:
| Field Name | Description |
|---|---|
| Service Unit Cost | The cost, to you, of the service or bundle. Unit cost will affect profitability calculations. BEISPIEL For a virus protection software, the cost of the license to you. |
| Service Unit Price | The Unit Price displays the Unit Price for the service or service bundle set in Admin. The Extended Price = the Unit Price X the number of Units. If Multi-currency is enabled, the Service Unit price field will display a currency indicator, and the price will be displayed in the customer currency. |
| Service Units | For each Service Bundle or Service selected, enter the number of Units to include in the contract. A unit is usually one supported device or item, for example, a PC, printer, server, or license. |
| Effective Date | The effective date defaults to the contract start date, but can be modified for specific services. If you select an effective date later than the contract start date, the first month's price for the service is prorated. This feature allows you to set the contract start date (which is the billing date) to the first of the month, but start billing for services later. |
- When the service setup is complete, click Finish. A Creating Contracts. note will display until all contracts have been created.
On this page, you set up the hourly rates for the contract. You can add rates to all contracts, or add and remove rates from individual contracts.
HINWEIS If Multi-currency is enabled, the default rate is added to the contract in the customer currency.
To add rates to all contracts:
HINWEIS The Apply Rate to All button is disabled if you selected organizations with different currencies.
- At the top of the page, click Expand to Select a Rate to Apply to All.
- Click the drop-down menu in the Role field and select a role.
- Enter the Hourly rate for the role.
- Click Apply Rate to All.
The rate is added to all contracts.
HINWEIS There is no way to remove a rate from all contracts. You must manually remove the rate from each contract.
To add and remove rates from individual contracts:
- In the Select Roles pane select one or multiple roles using Shift or Ctrl + Click.
- Click the plus sign next to the contract name.
All selected roles are added to the contract.
- Modify the Hourly Rate for each contract as needed.
- To remove a role from a contract, click the delete icon in front of the role name.
- Click Finish. A Creating Contracts. note will display until all contracts have been created.
On this page, you add the billing milestones for the contract. Milestones must be added individually to each contract.
To add a milestone:
- Click the plus sign next to the contract name once for each milestone you want to add.
- Complete the following fields:
| Field | Description |
|---|---|
| Milestone Name (required) |
The descriptive name of the milestone. |
| Due Date (required) |
The expected due date for the milestone. Note that the milestone will only become billable on this date if the Status is Ready to Bill. |
| Amount | The amount to be billed when the milestone has been reached. Defaults to 0.00. |
| Billing Code Name | The name of the Milestone billing code with which the milestone is associated. It determines the tax category applied to the milestone. |
| Ready to Bill | If this box is checked and the Date Due has been reached, the milestone is now available for billing on the Approve and Post > Milestones tab. If this box is not checked, the milestone is created with the status of In Progress, and must be set to Ready to Bill on the Milestones page of the contract or by editing the associated phase in the project. |
| Description | You should enter a description of the objective that must be reached before the milestone becomes billable. |
Block Hour Multipliers determine how many block hours are consumed when a specific role rate is used for a one-hour work entry. Your Administrator can specify standard block hour multipliers for each role when setting up roles. Refer to Abrechnungsrollen hinzufügen.
BEISPIEL If the Contract Rate is $60, but a Senior Engineer is billed out at $120, applying a Block Hour Multiplier of 2.00 will use up 2 block hours for each hour worked by a senior engineer. Conversely, if an Administrative Assistant's role has a block hour multiplier of 0.50, he would use only one half hour of contract time ($30.00) for each hour worked; that is, he would have to work 2 hours for one hour to be deducted from the contract.
To add Block Hour Multiplier to all contracts:
- At the top of the page, click Expand to Select a Multiplier to Apply to All.
- Click the drop-down menu in the Role field and select a role.
- Edit or accept the multiplier for the role.
- Click Apply Multiplier to All.
The multiplier is added to all contracts.
HINWEIS There is no way to remove a multiplier from all contracts. You must manually remove the multiplier from each contract.
To add and remove multipliers from individual contracts:
- In the Select Roles pane select one or multiple roles using Shift or Ctrl + Click.
- Click the plus sign next to the contract name.
All selected roles are added to the contract using the default multiplier set up in Admin.
- Modify the Contract Block Hour Multiplier for each contract as needed.
- To remove a multiplier from a contract, click the delete icon in front of the role name.
- Click Finish. A Creating Contracts. note will display until all contracts have been created.
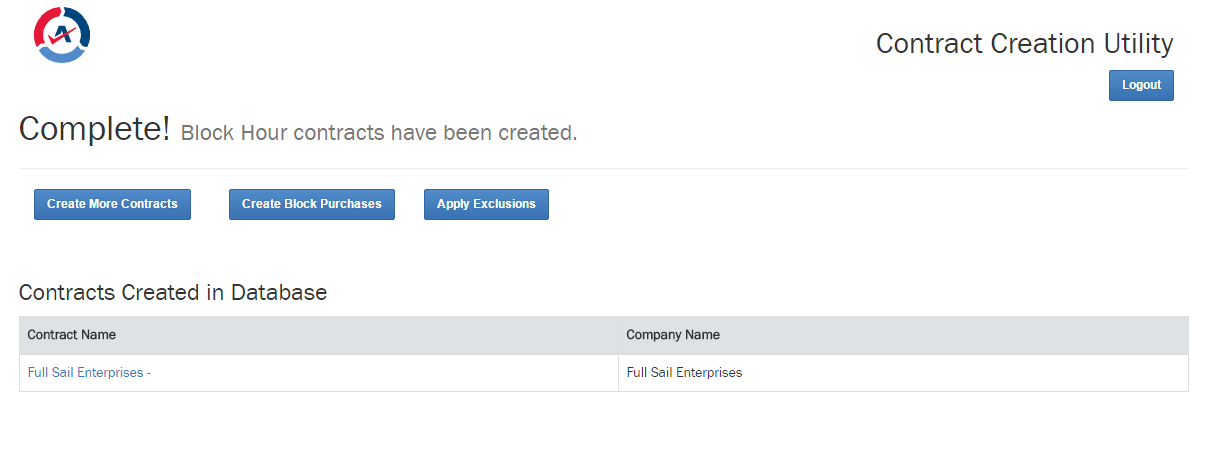
The last page of the Contract Creation Utility lists all the contracts that have been created. On this page, you can apply exclusions to the contracts you just created, add block, retainer and ticket purchases, open and review the contracts you created, or return to the first page to create more contracts.
- To stay in the Contract Creation Utility and return to the Search & Select Companies page, click Create More Contracts.
- To purchase block hours, retainers or tickets for a contract, click Create Block (Retainer, Ticket) Purchases.
- To apply exclusions to the contracts you created, click Apply Exclusions. Refer to Exclusions.
- To open a contract you just created, click the hyperlinked name of the contract. The new contract will open to the Summary page.
Block, retainer and ticket purchases must be added to block hour, retainer and per ticket contracts after the contracts have been created. For this reason, the Create Block (Retainer, Ticket) Purchases button appears on the Complete page.
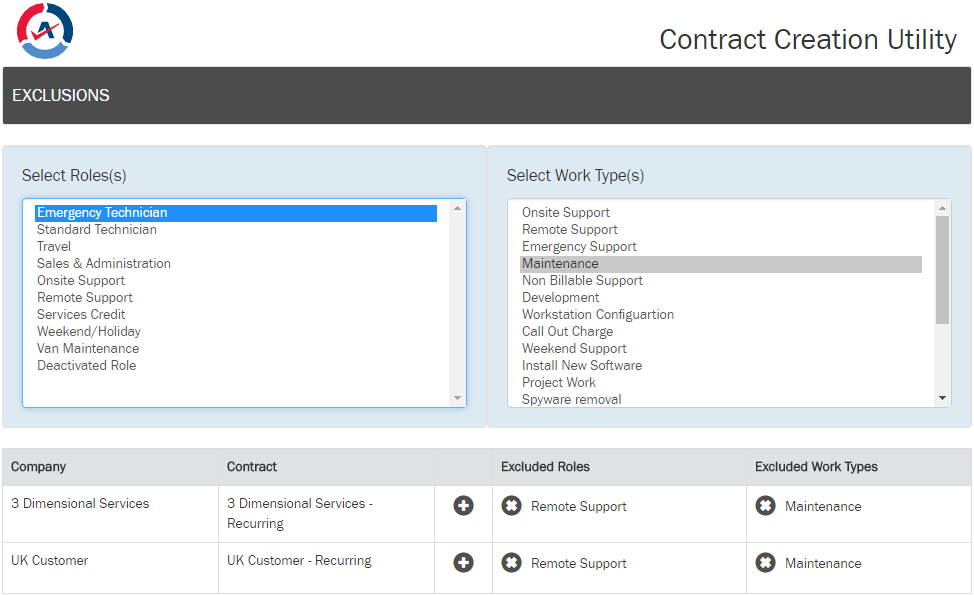
To exclude certain roles and/or Work Types from one or multiple contracts you just created, click Apply Exclusions on the Complete Page.
The Exclusions page will open.
- Click to select or use Shift or Ctrl + Click to select any combination of roles and work types.
- Click the plus sign to add the selected roles and/or work types as contract exclusions.
HINWEIS Exclusions are added one contract at a time.
- To remove a role or work type exclusion, click the delete icon in front of the item.
- Click Finish. A Creating Exclusions message is displayed, then you are returned to the Complete! page.
