Configuring the Outlook extension
BEVOR SIE BEGINNEN If you have not installed the Outlook Extension refer to Downloading and installing the MS Outlook Extension.
On the Outlook > Autotask menu > Options window, each user can configure how Autotask and Outlook will work together.
The first time you open Outlook after installing the extension, the Outlook > Autotask menu > Options window opens automatically to the Login tab. Provide the following Autotask credentials, so Outlook knows which Autotask instance to access, and whose data to exchange:
- Enter your Autotask Username and the URL of your Autotask instance, for example, ww3.autotask.net.
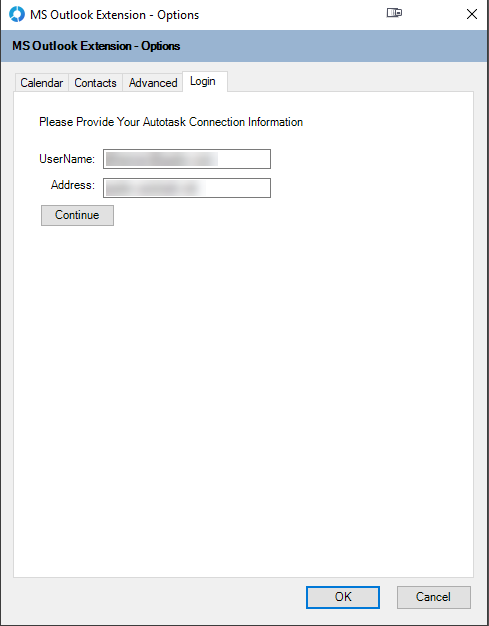
Be sure to specify the correct Autotask zone, as indicated by the number following ww. For information on discovering your zone, refer to Wo werde ich gehostet?. - Click Continue.
- Enter your Autotask Password.
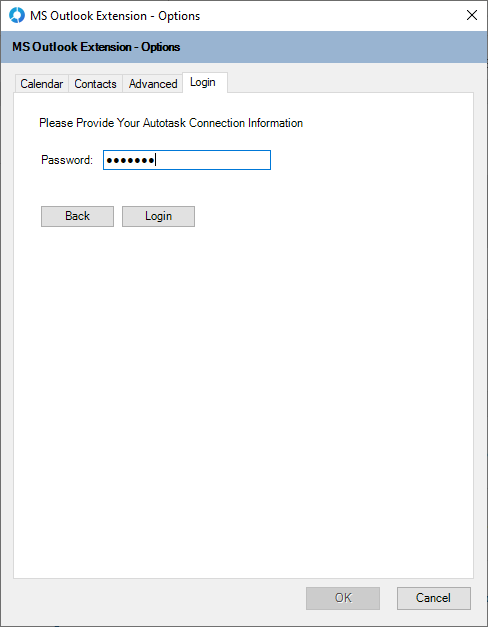
- Click Login. Autotask will verify that your user account exists in the Autotask zone you have specified.
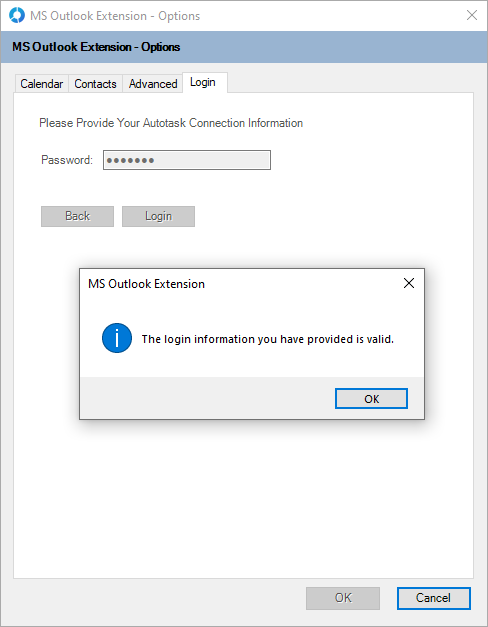
- Click OK to complete the initial authentication process.
When you install the MS Outlook Extension, calendar integration is initially disabled.
To optionally enable calendar integration, do the following:
- On the Autotask menu, click Options. The MS Outlook Extension - Options window opens.
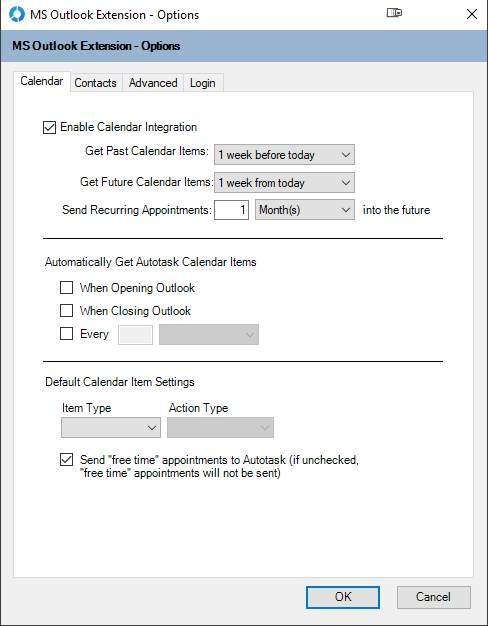
- Select the Calendar tab.
- To enable calendar integration, click the Enable Calendar Integration check box.
- Configure the following options:
| Option | Description |
|---|---|
|
Get Past Calendar Items |
Select the time window for synching calendar items in the past. Get Past Calendar Items can be set to Not before today (default), or 1, 2 or 3 weeks before today. |
|
Get Future Calendar Items |
Select the time window for synching future calendar items. Get Future Calendar Items can be set to 1 week from today (default) , 2, 3, 4, 5, 6 weeks from today, and 1 year from today. |
|
Send Recurring Appointments # Days/Weeks/Months into the future |
Recurring items in Outlook can be established without an ending date, but Autotask requires a date range in order to display the items on the calendar. All recurring Outlook appointments that fall into the date range established here will be sent to Autotask. |
|
Automatically Get Autotask Calendar Items |
|
|
When Opening Outlook |
If this check box is selected, calendar items are refreshed from the Autotask instance each time you open Outlook while connected to the Internet. If you authenticate using single sign-on, you must log in with your identity provider each time you open Outlook. |
|
When Closing Outlook |
If this check box is selected, automatic updates from the Master Autotask instance happen each time you exit Outlook while connected to the Internet. If you authenticate using single sign-on, you must log in with your identity provider each time you open Outlook. WICHTIG If When Closing Outlook is selected and you close Outlook, the application will appear closed but the synchronization will still be running in the background. If you attempt to re-open Outlook during that time, the Autotask menu will have disappeared. Close Outlook again and re-start after the synchronization has finished. |
|
Every # Minute(s)/Hour(s)/Day(s)/Week(s) |
If this check box is selected, you can determine the number of minutes, hours, days, or weeks that should pass between automatic updates from the Autotask calendar. HINWEIS Any combination of the 3 selections is allowed. If none are checked, you can use the manual Get Calendar Items option in the Autotask > More menu. |
|
Default Calendar Item Settings |
|
|
Item Type |
Select the default Item Type you want to use when you transfer an Outlook Appointment to Autotask. If you are a salesperson and you are scheduling mostly sales appointments, select To-Do, if your Outlook appointments are mostly private appointments, select Appointment. |
|
Action Type |
If To-Do is selected, a default Action Type must be selected from the drop-down list. Refer to Aufgabenarten. |
|
Send "free time" appointments to Autotask (If unchecked, free time appointments will not be sent) |
By default, MS Exchange or Outlook appointments where time is shown as "Free Time" are still synced to Autotask and will block time on your calendar. Clear this setting to prevent synchronization of free time appointments. |
- Click OK to save your settings.
HINWEIS For calendar synchronization between Autotask and Outlook to work, the Windows Date Format on the local machine and the date setting in Autotask need to be the same.
• To adjust date settings in Windows, go to the Control Panel > Clock, Language and Region > Region and Language > Change the date, time or number format. In the pop-up window, select an option from the Short date drop-down list.
• To adjust date settings in Autotask, go to My > Miscellaneous > Settings. Refer to Einstellungen.
HINWEIS Calendar synchronization will continue even when the computer enters Sleep or Hibernation mode, but you must not allow the network adapter to power off. Allow the computer to power off... needs to be unchecked.
When you install the Autotask MS Outlook extension, contact integration is initially disabled.
To enable contact integration, do the following:
- On the Autotask menu, click Options. The MS Outlook Extension - Options window opens.
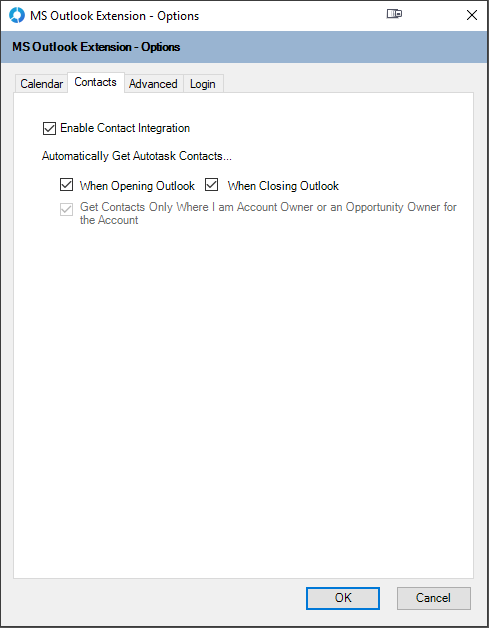
- Select the Contacts tab.
- To enable contact integration, click the Enable Contact Integration check box.
- Configure the following options:
| Option | Description |
|---|---|
|
Automatically Get Autotask Contacts... |
|
|
When Opening Outlook |
If this check box is selected, contacts are refreshed from the Autotask instance each time you open Outlook while connected to the Internet. If you authenticate using single sign-on, you must log in with your identity provider each time you open Outlook. |
|
When Closing Outlook |
If this check box is selected, contacts are refreshed from the Autotask instance each time you exit Outlook while connected to the Internet. If you authenticate using single sign-on, you must log in with your identity provider each time you open Outlook. WICHTIG If When Closing Outlook is selected and you close Outlook, the application will appear closed but the synchronization will still be running in the background. If you attempt to re-open Outlook during that time, the Autotask menu will have disappeared. Close Outlook again and re-start after the synchronization has finished. |
|
Get Contacts Only Where I am Account Owner or an Opportunity Owner for the Account |
This selection is disabled if your Autotask Administrator has enabled the Kontaktintegration auf zuständigen Mitarbeiter und Verkaufschancen-Verantwortlichen beschränken system setting for your Autotask instance. If the administrator has not done that, enabling contact integration will synchronize your entire Autotask contact list to your Outlook Contacts folder. This may not be what you want.
|
- Click OK to save your settings.
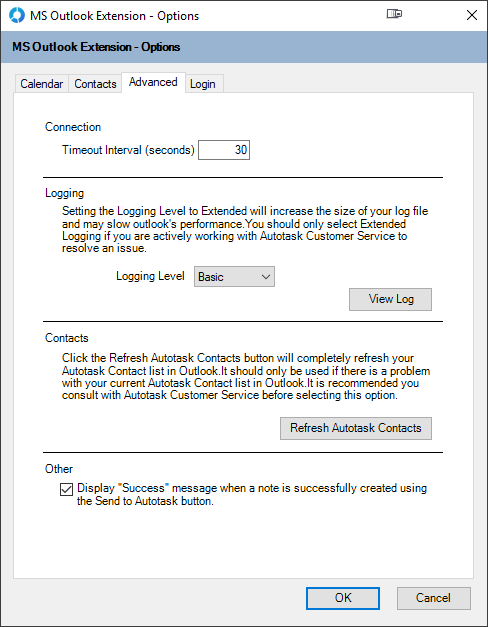
The settings on the Advanced tab should only be changed if you are prompted to do so by Der Kaseya Helpdesk.
Do not change the default setting for Timeout Interval or Logging level field unless told otherwise by Der Kaseya Helpdesk.
| Setting | Description |
|---|---|
|
Timeout Interval |
This setting specifies, in seconds, how much time Outlook shall give the Autotask server to respond. |
|
Logging |
By default, the logging level is set to Basic. Do not change the default setting for the Logging level field unless told otherwise by Der Kaseya Helpdesk. |
|
Contacts |
The Refresh Autotask Contacts button should be clicked only when you have accidentally deleted contacts that were updated from Autotask and you have to rebuild your contact list in Outlook. |
|
Other |
The Display "Success" message when a note is successfully created using the Send to Autotask button is enabled by default. A message box is displayed after you click the Send to Autotask button that lets you know that the note was created successfully in Autotask. If you do not want the message to display, clear the check box. This setting can also be disabled from inside the message box. HINWEIS Disabling the "Success..." message will not disable the alert that automatically appears if the Outlook Extension failed to create the note. |
